How to deploy an Express REST API to an AWS EC2 instance
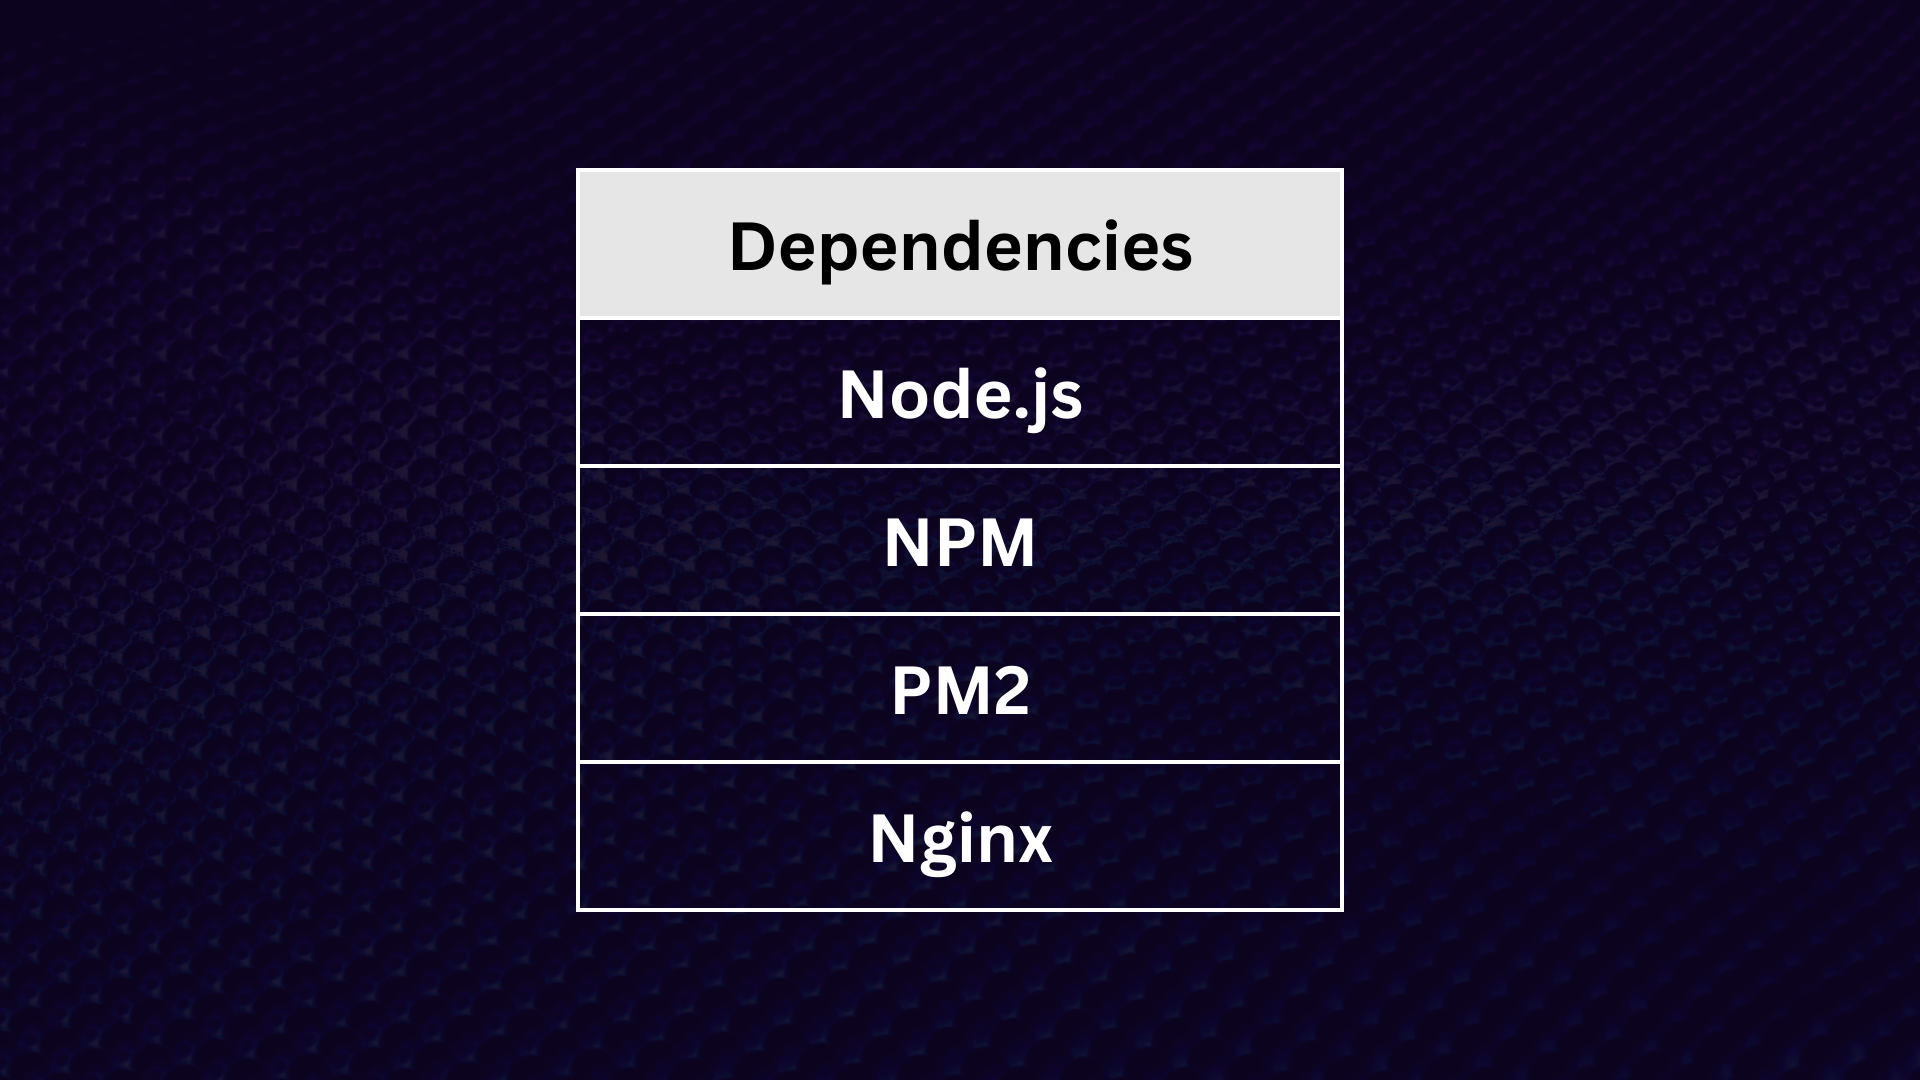
At the end of this tutorial, our tech stack will look like this:
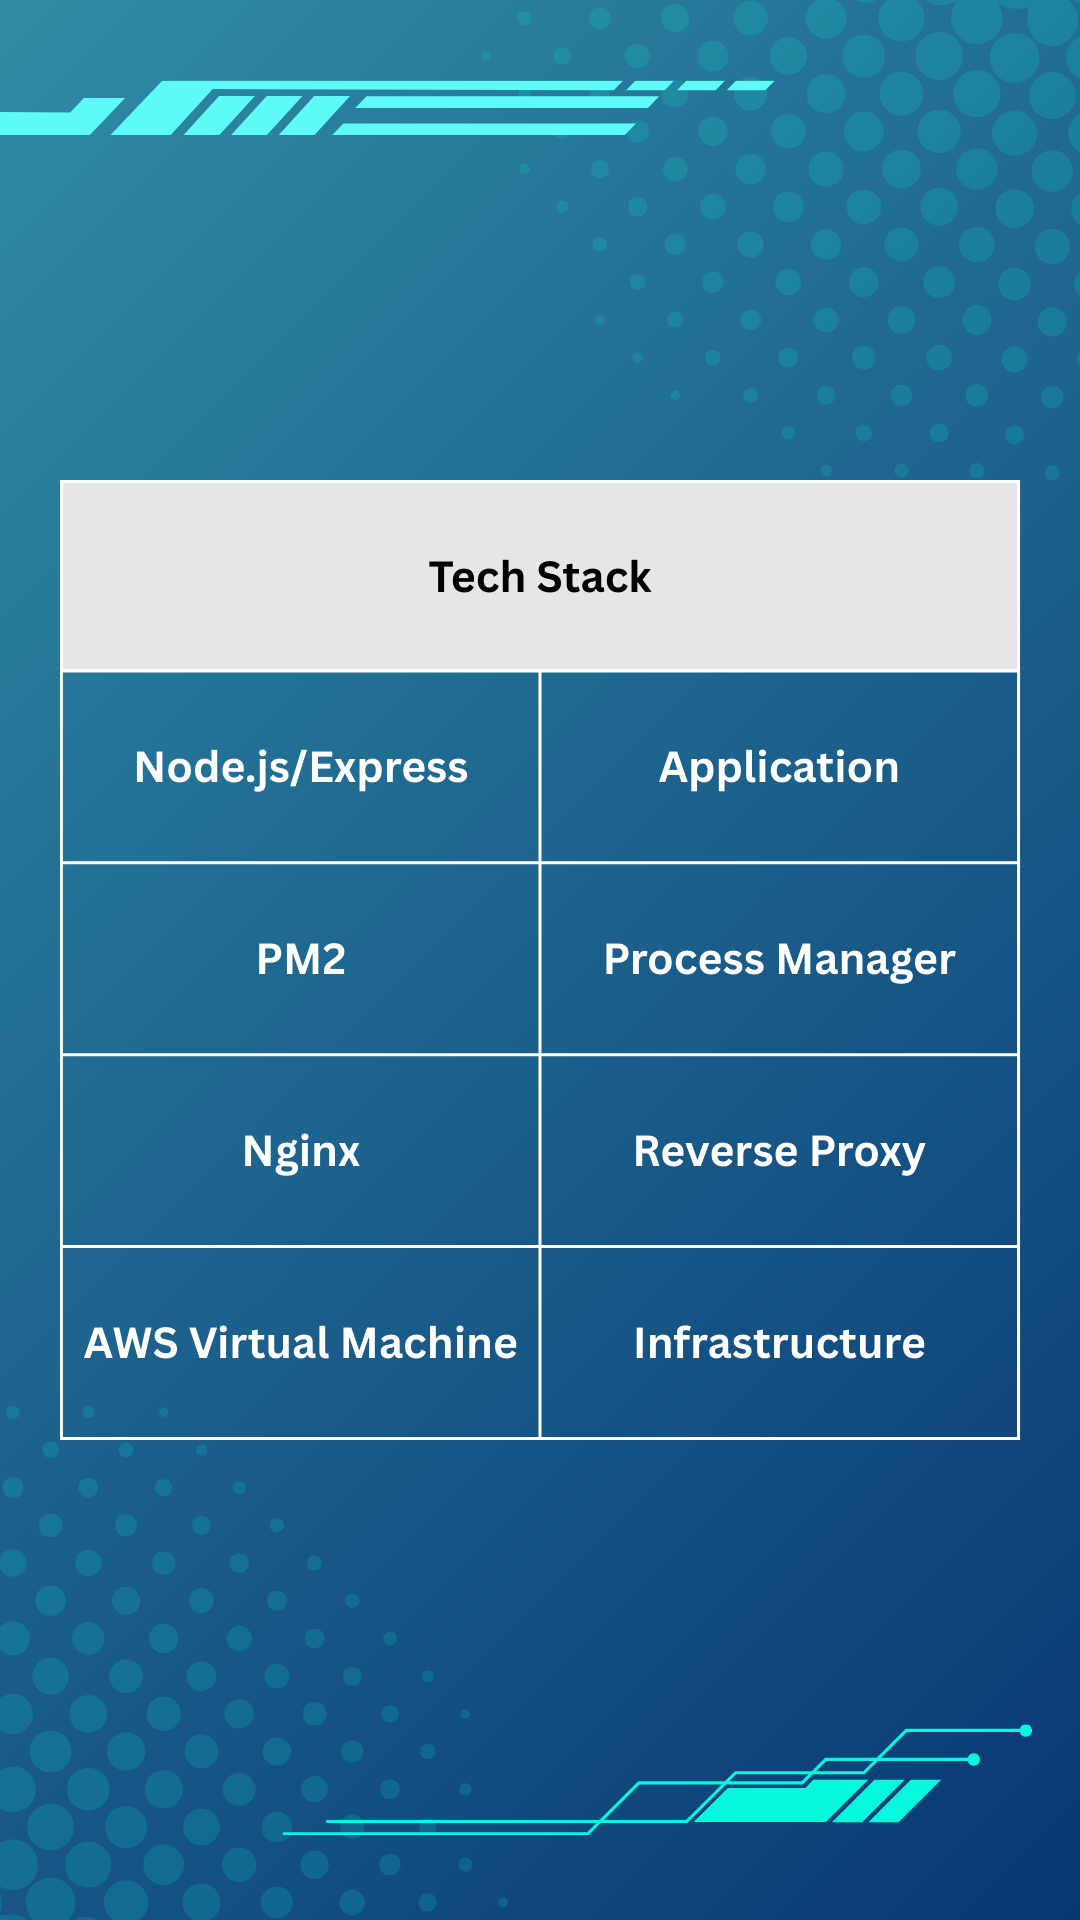
Our express application will be served by pm2, which is a process manager that gives us logging, monitoring, and fault tolerance, as well as other benefits. We'll use nginx to reverse proxy http requests over port 80 to our pm2 process. This tech stack will be deployed to an aws virtual machine. Our express api is a simple todos application with get, post, patch, and delete requests. It listens to port 3000 on all interfaces.
Step 1 - provision AWS EC2 instance
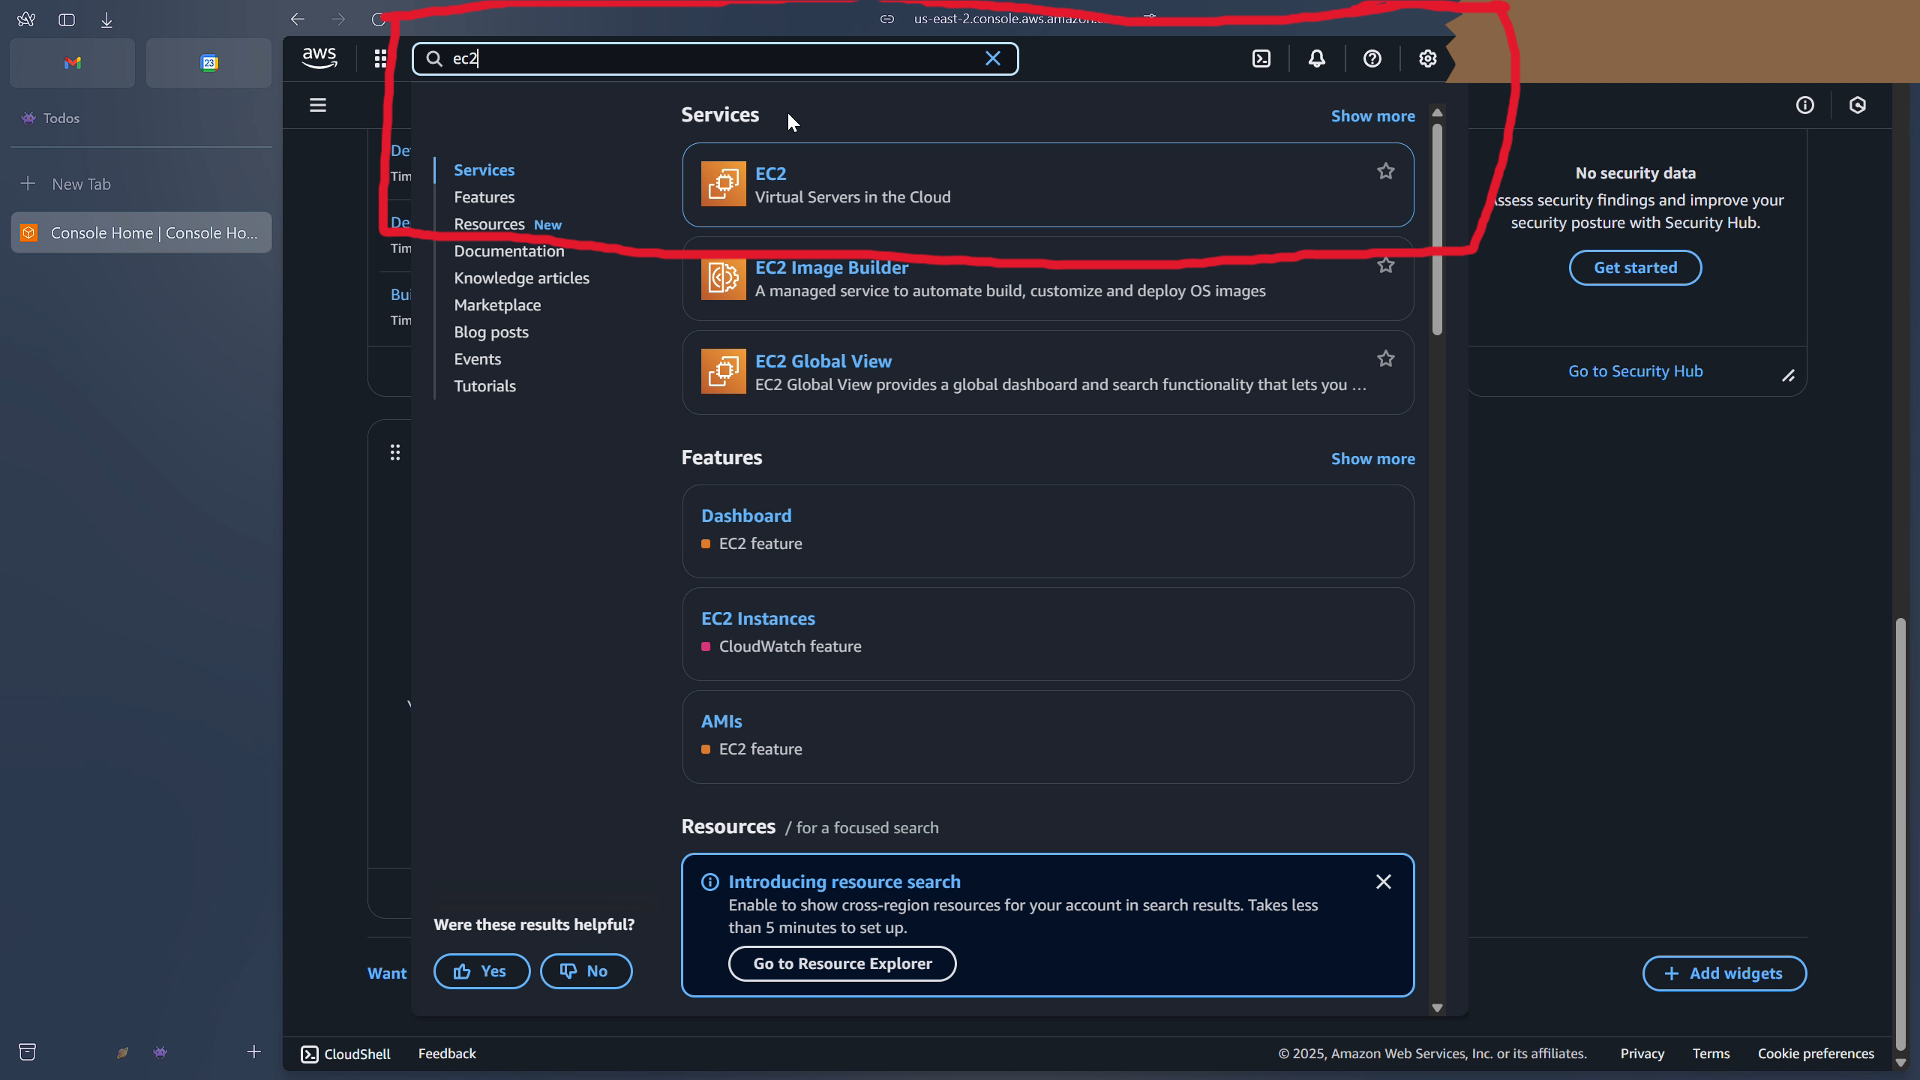
From the aws console dashboard, in the search bar, type ec2, which is aws's virtual machine offering.
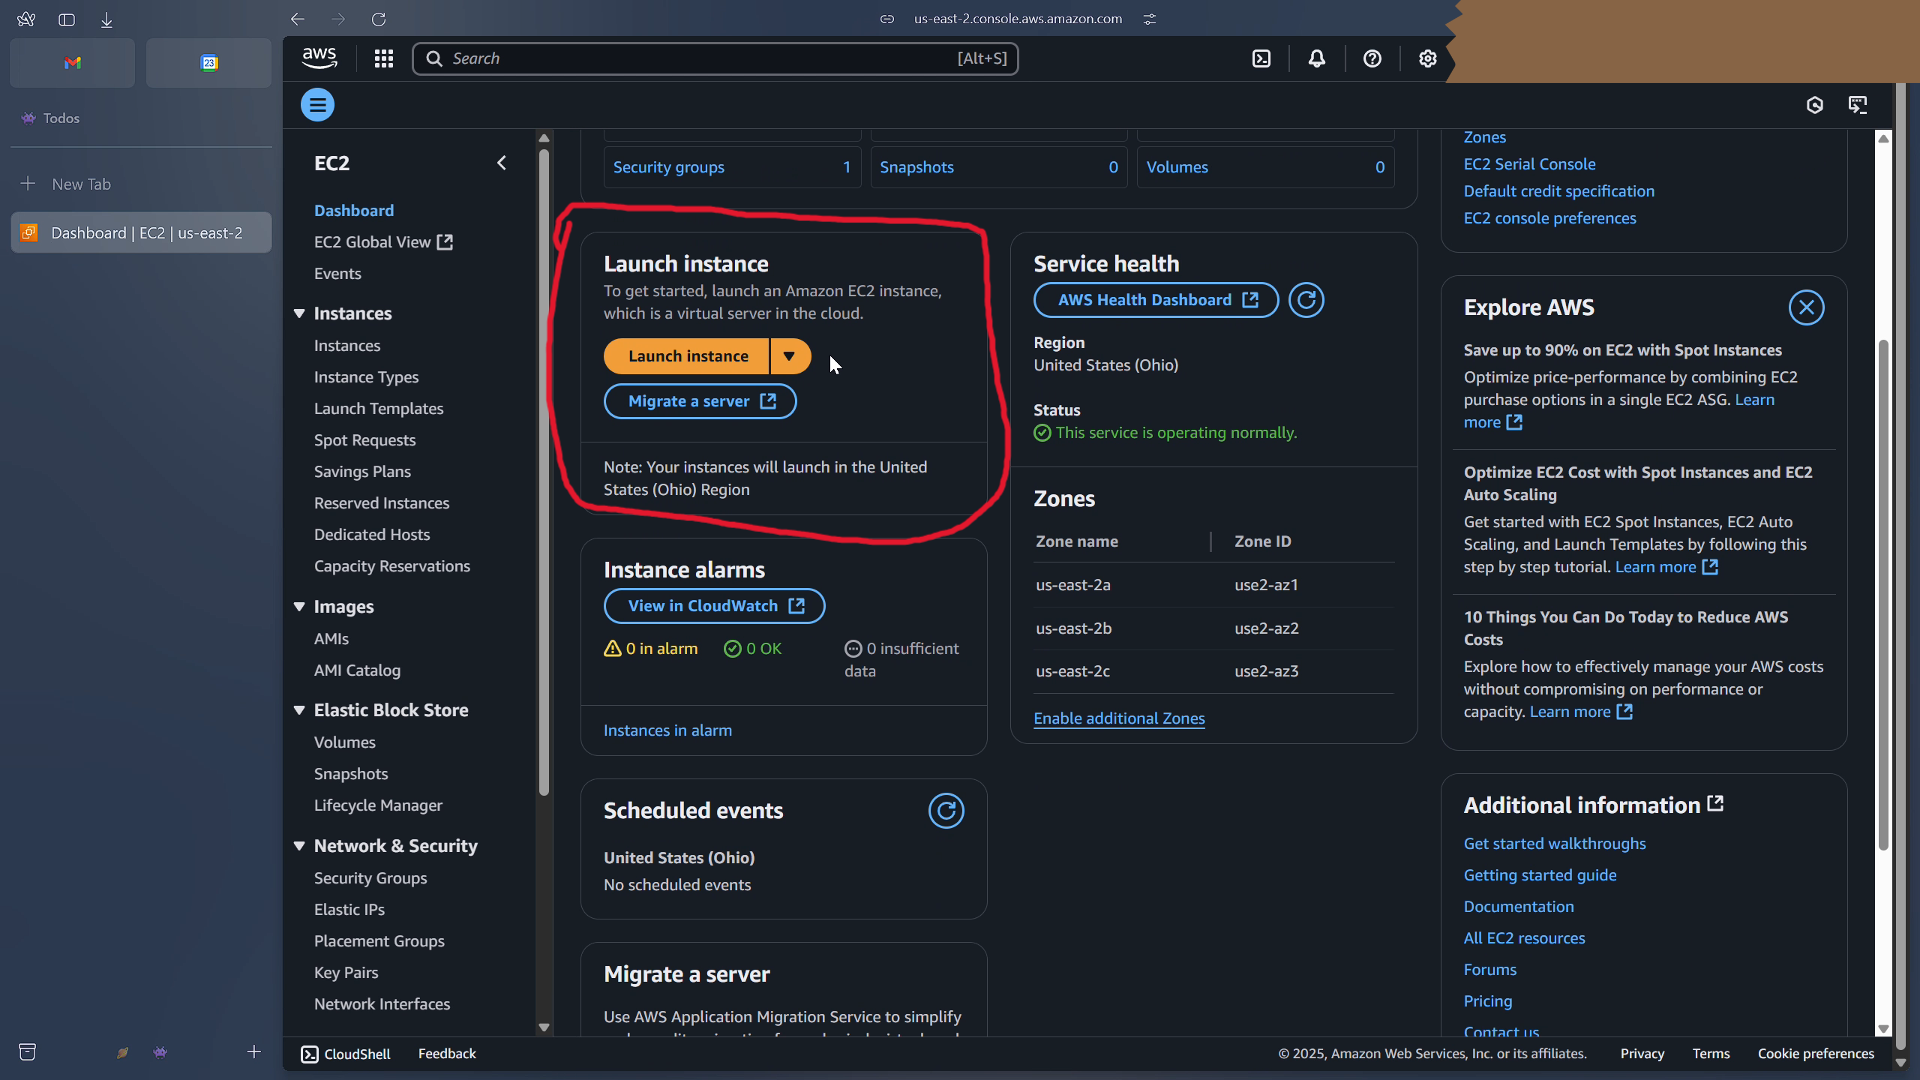
From the ec2 dashboard, click on launch instance.
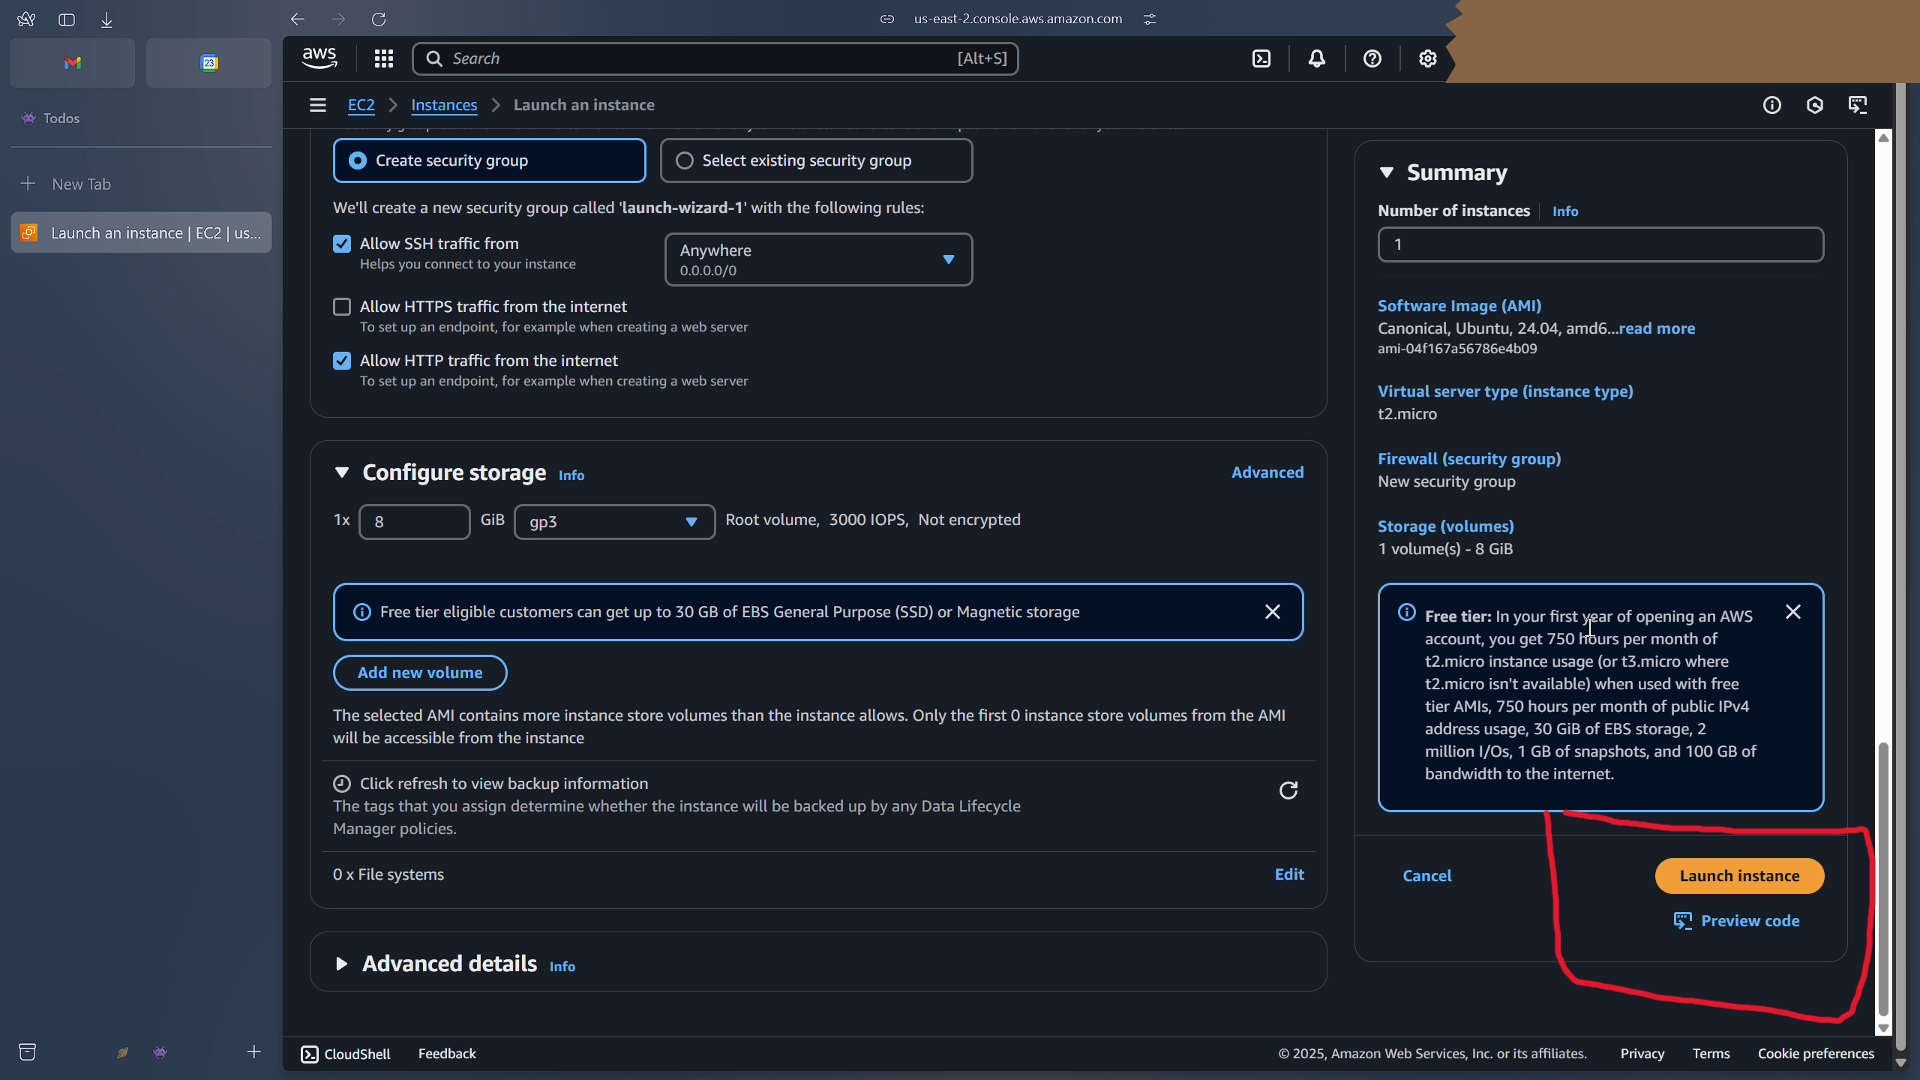
We only need to configure a few things here.
- Give the instance a name of
todos-server.
- Select
ubuntuas the operating system, leaving the architecture and the instance type as they are.
- Create a new SSH keypair named
todos-server, and download the private keyfile to your local machine.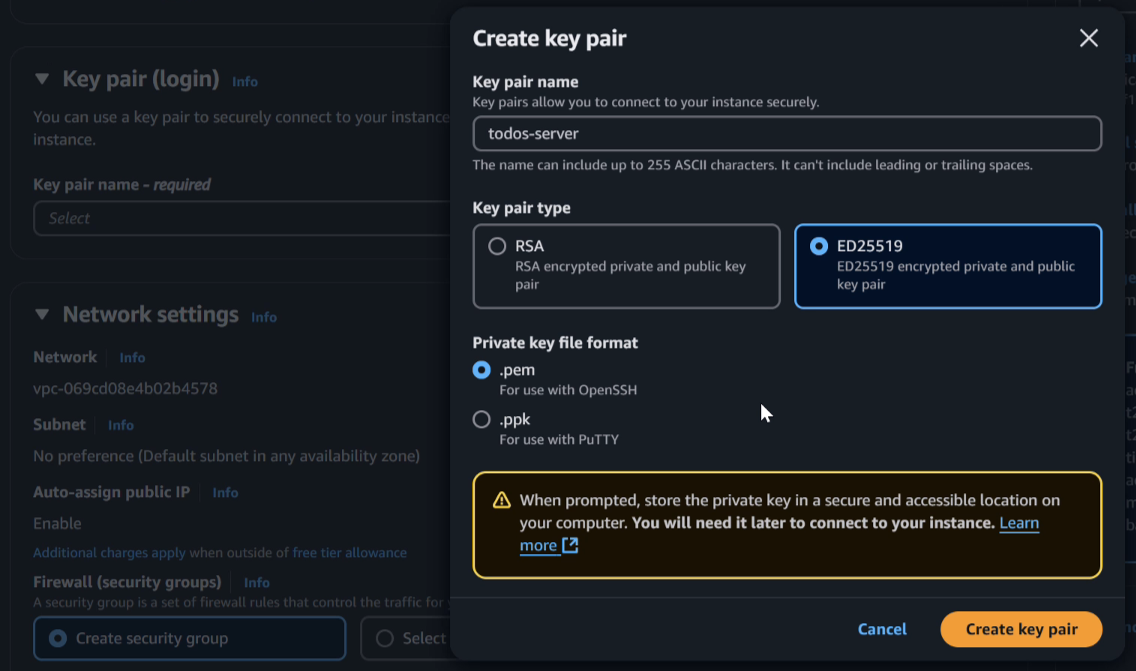
- Under
network settingscheck the box to allow http traffic from the internet.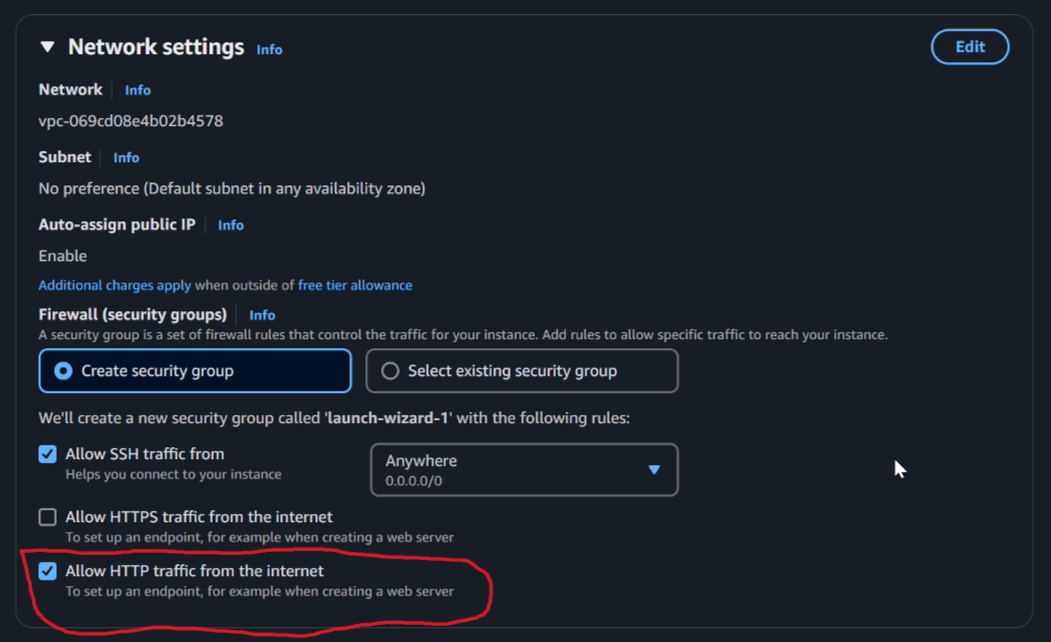
2 important things to note here are that we will only be accessing this instance by its public ip address, and we will only be using http over port 80.
We'll cover dns and tls configuration in a later video.
Leave all other options as they are, and click launch instance.
Once the instance is launched, click on its ID, so that we can see its public ip address.
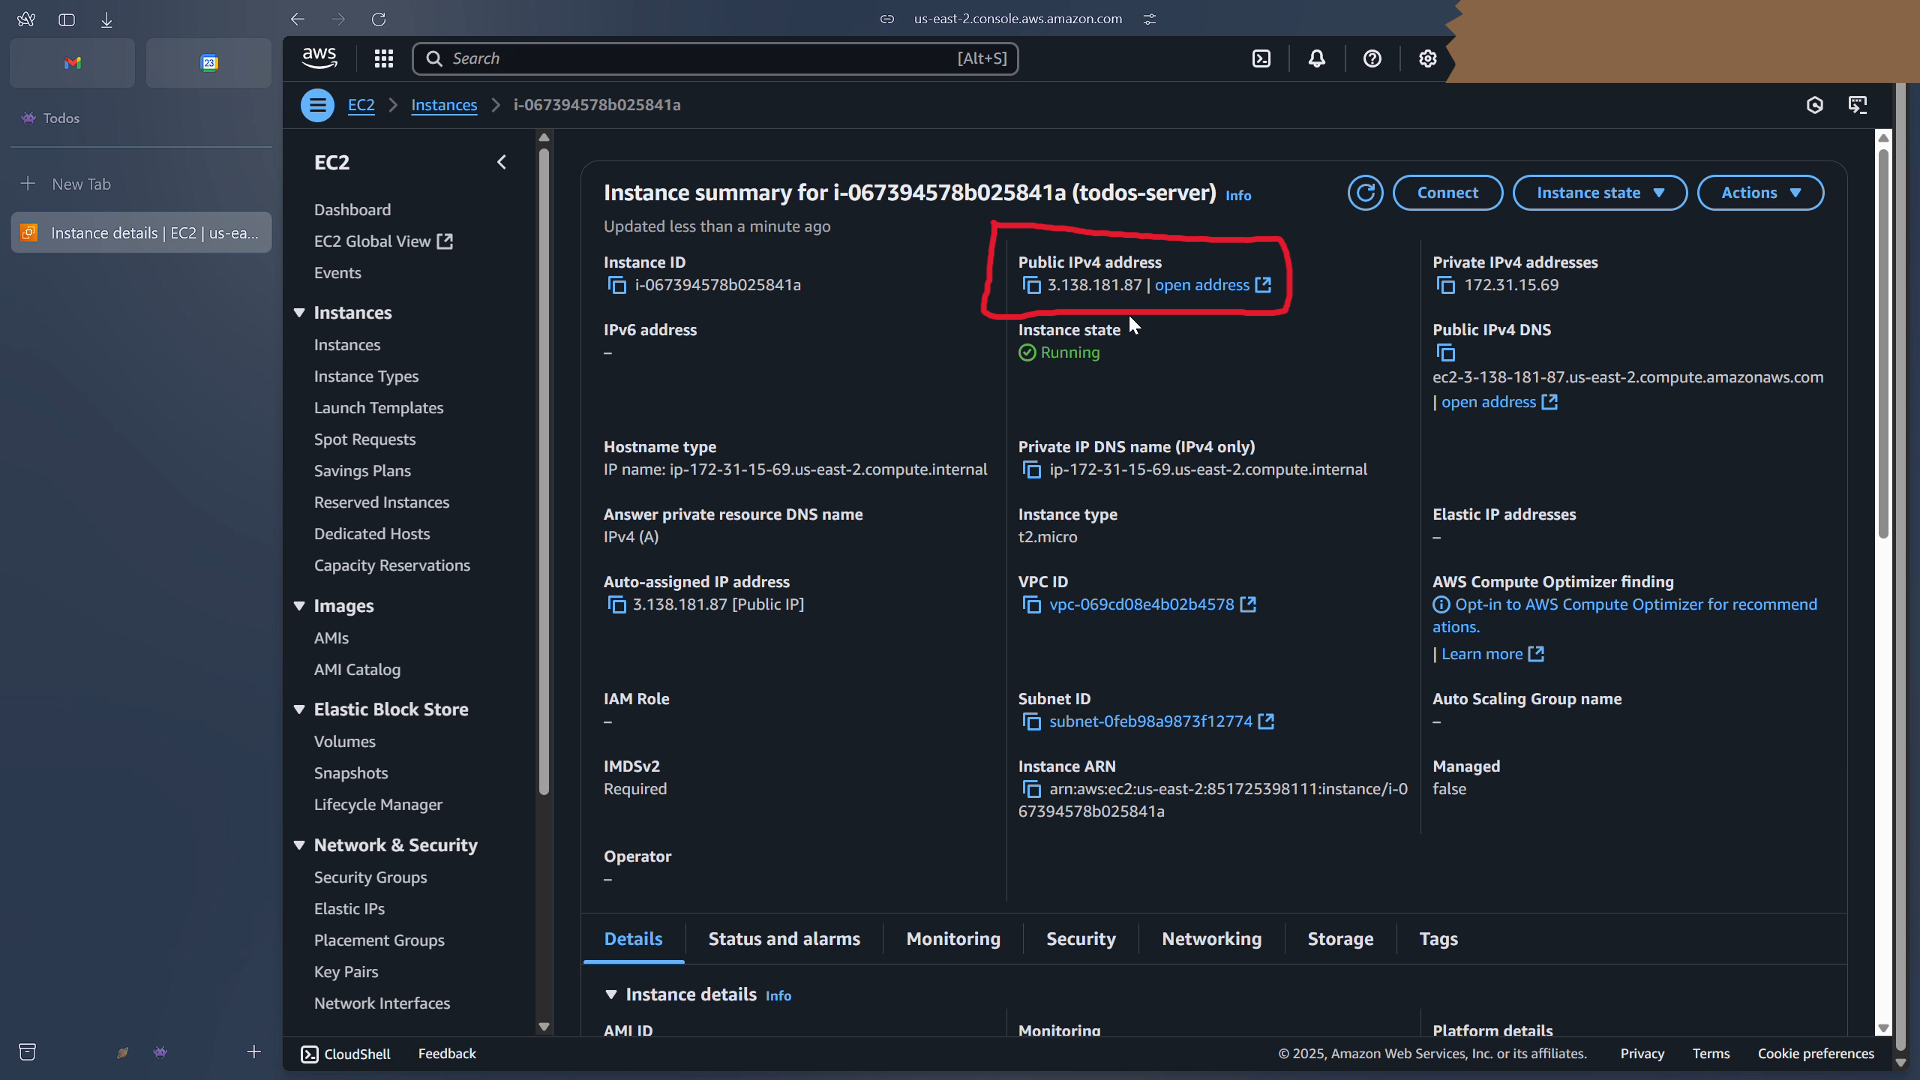
We'll use this ip address for further configuration.
Step 2 - SSH into EC2 instance
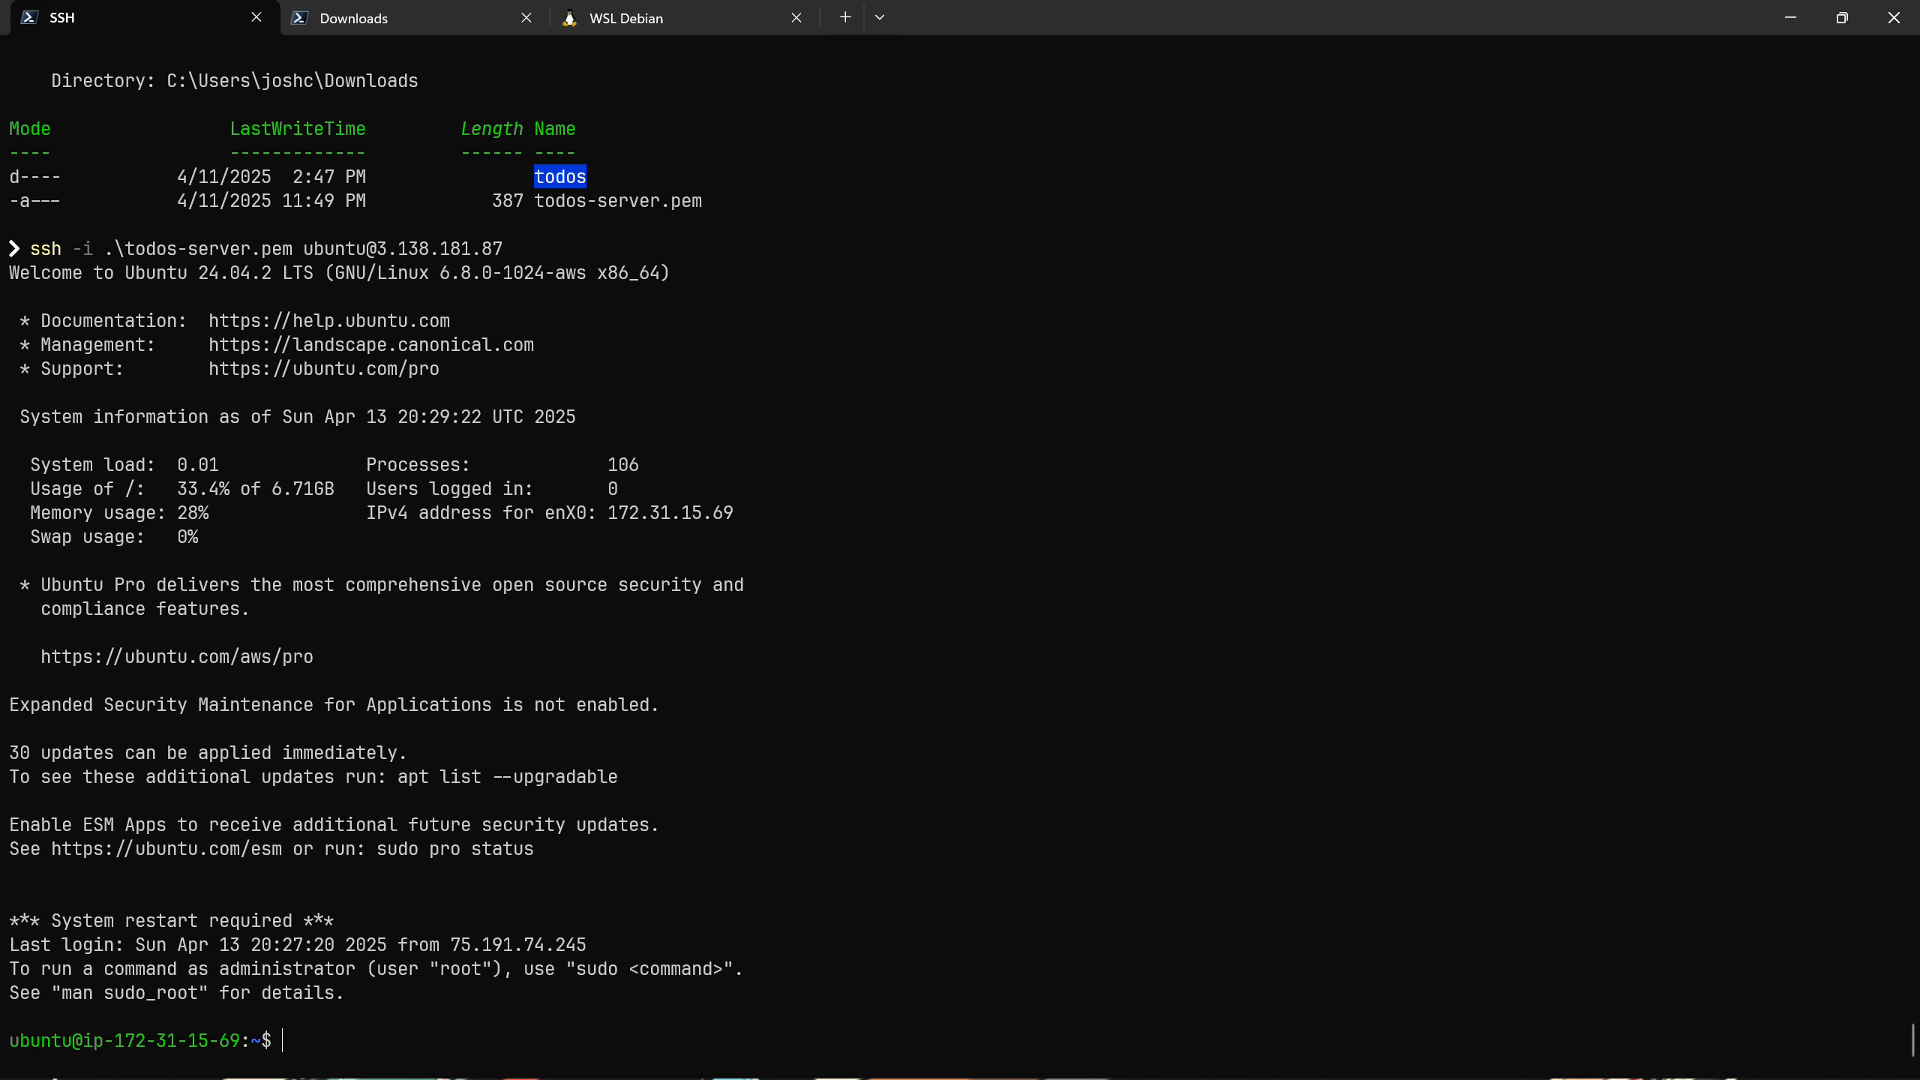
In my terminal emulator I'm going to navigate to the directory that I downloaded the private key file to.
In this case, that file is todos-server.pem.
I'm then going to type ssh -i todos-server.pem ubuntu@<ec2-instance-public-ip>.
I'll press enter, and now we have successfully SSH'd into our virtual machine.
Step 3 - Install Node.js dependencies
We'll begin by installing the first 3 dependencies on our vm. Still in the ssh session in our vm, im going to install node and npm my preferred way, using the volta utility. This command is pasted from the volta.sh website.

Once this command finishes, i'm going to source my .bashrc file.
Now, i'll type volta --version, and i see that it is installed and accessible to me.

I will now type volta install node, and this will install both the nodejs and npm lts.
If i now type node -v, i have 22.14 lts, and if i type npm -v, i have 10.9.2 lts.

I will now install my 3rd dependency by typing npm install -g pm2 to install it globally.

And now our first 3 dependencies are successfully installed.
Step 4 - Copy project files
The next step is to copy our project files from our local machine to our ec2 instance.
Note that in a production environment, you would likely use a combination of version control (usually git) and some form of CI/CD pipelines to accomplish this.
We'll cover those technologies in a later tutorial.
I'm going to use scp to copy the files in this case.
Back in my terminal emulator on my local machine, I'm going to type the scp command similarly to the ssh command.
I will type scp, with the -i option to specify the todos-server.pem file as credentials, also passing the -r option to copy recursively, and the entire todos directory which contains our project files.
I will then type ubuntu@1.1.1.1:/home/ubuntu.

I will press enter, and we can see that all 4 project files have copied over.
Back in my ssh session in the ec2 instance, i will type ls to confirm that the files are here.

I will cd into the todos directory, and run npm install to install our nodejs dependencies.

Step 5 - Serve application with PM2
I will now use pm2 to start the application by running pm2 start index.js, which is our application's entry point.
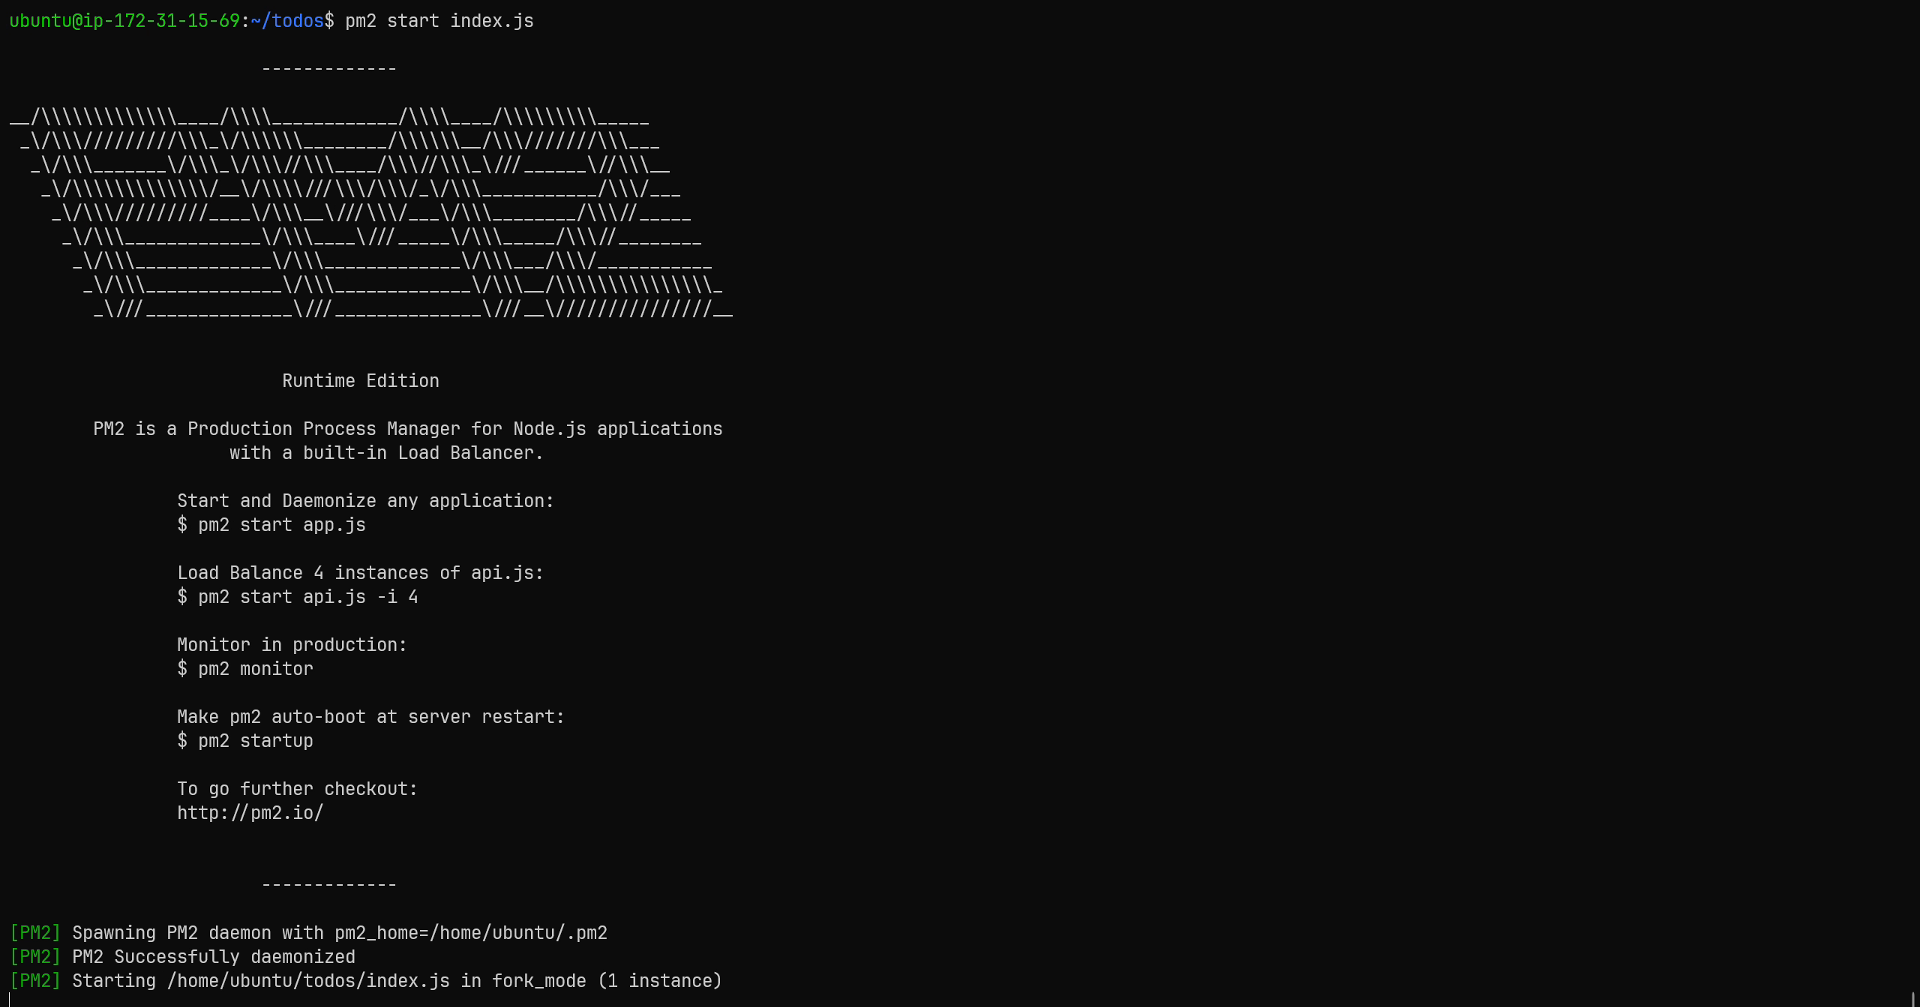
If i now run pm2 ls, we see a status of online, which indicates that the application is running properly.

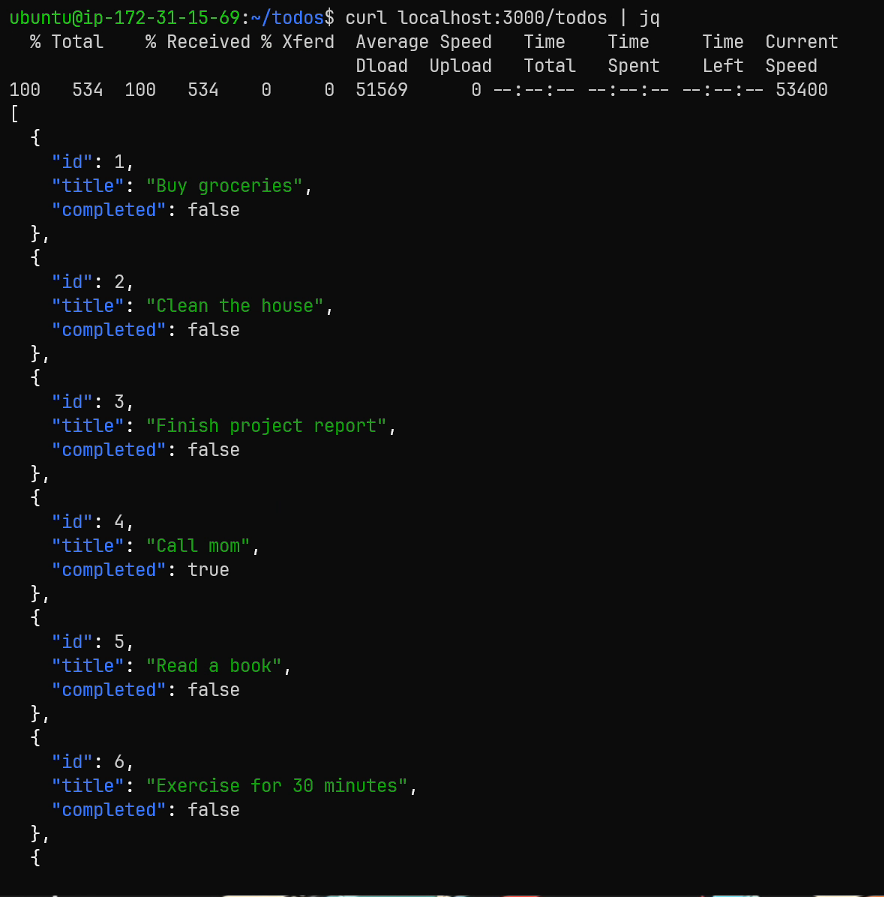
We can test this by typing curl localhost:3000/todos, and we get a nicely formatted json array of todos.
I'm going to execute 2 additional pm2 commands, the first of which is pm2 startup, which will create a startup script for my currently managed processes.
The second command is pm2 save, which will save the current process list.

Now our application will persist across instance reboots.
Step 6 - Install and configure Nginx reverse proxy
The last step of this deployment is to install and configure nginx as a reverse proxy.
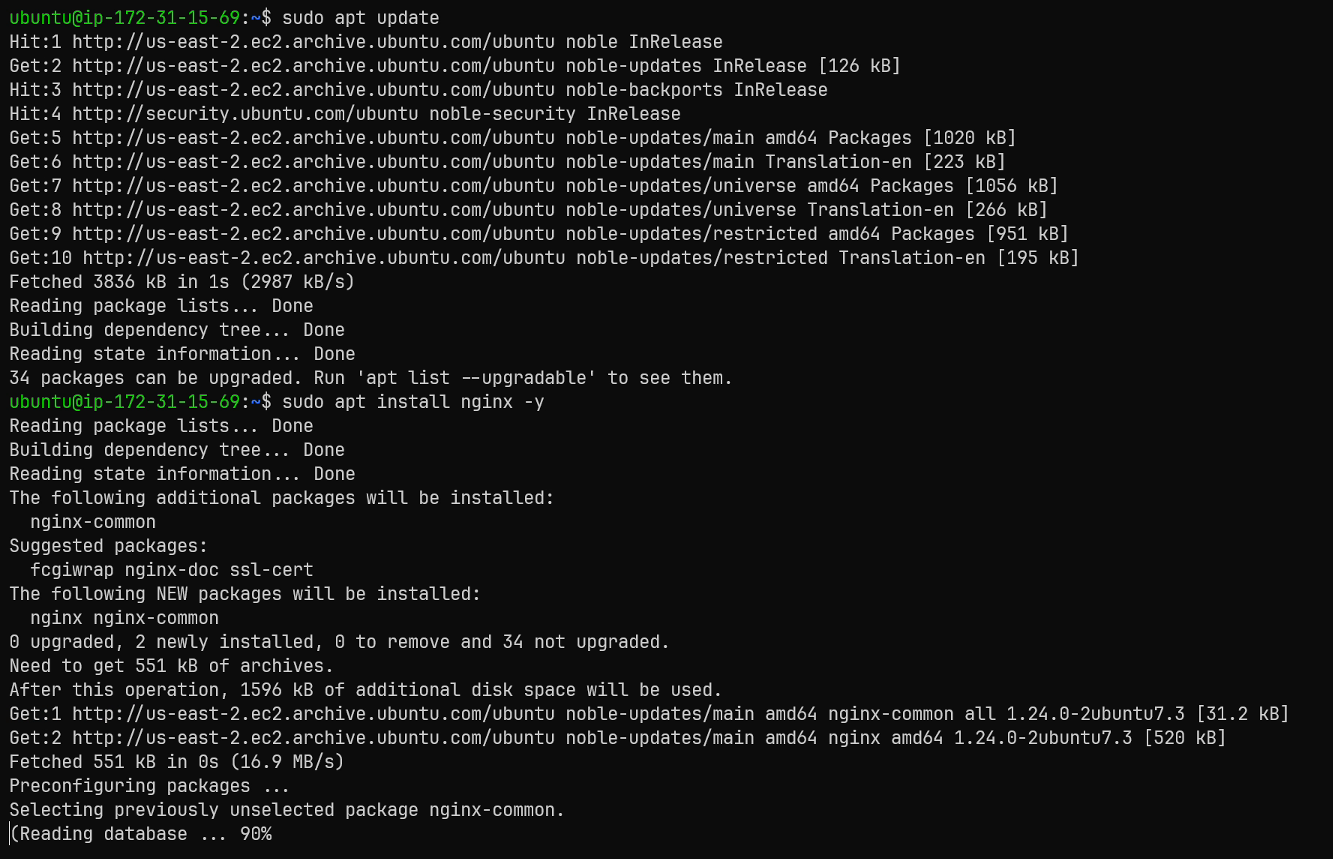
I will begin by running sudo apt update, to update the system's package list.
Now i will run sudo apt install nginx -y to accept the installation automatically.
Now that nginx is installed, we need to create a simple default configuration file to reverse proxy to our application.
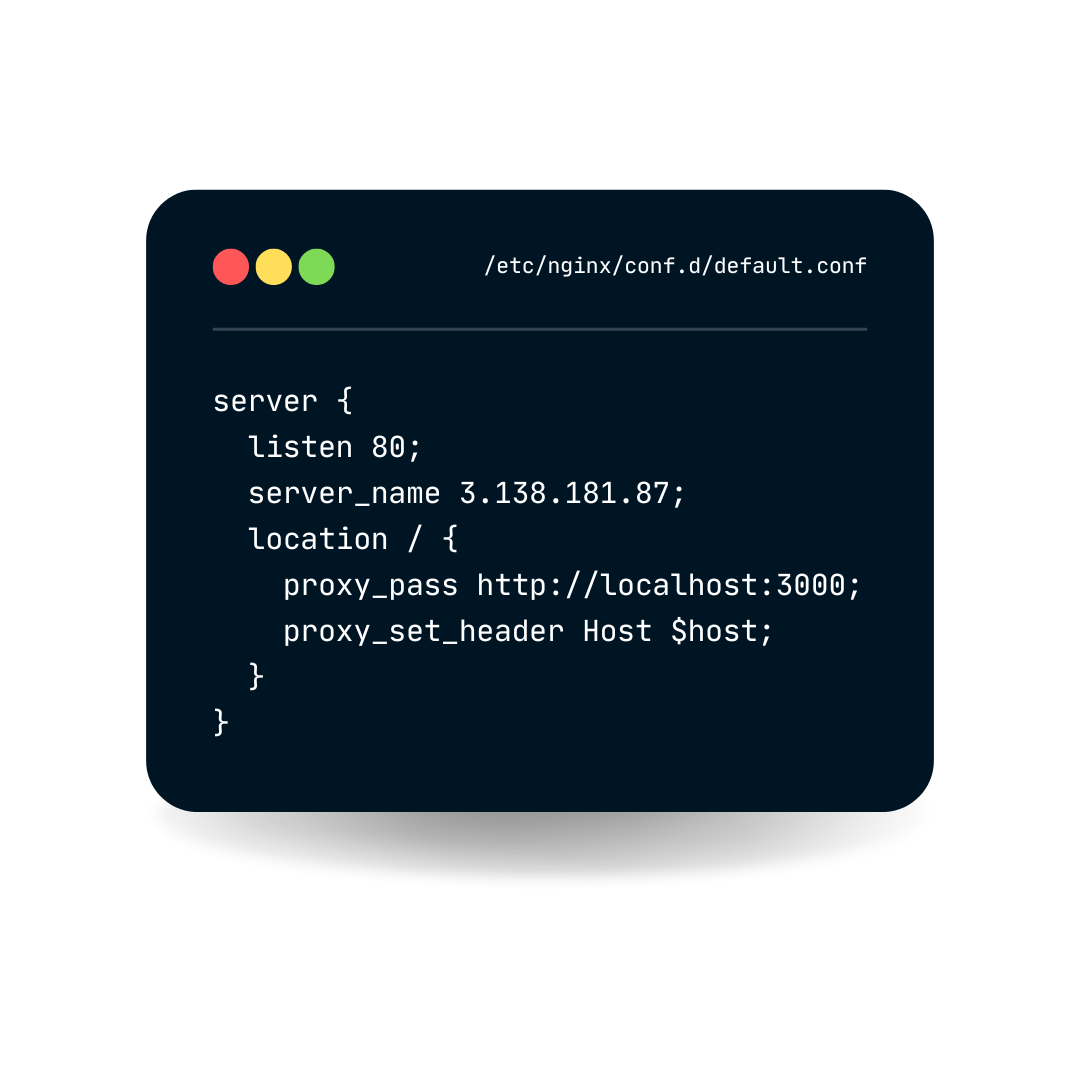
This file will do the following:
- Listen on port 80 to all requests bound for the public ip address of our ec2 instance.
- At the root location, reverse proxy to our todos server running on
localhost:3000. - Forward the host header to our todos server as nginx received it.
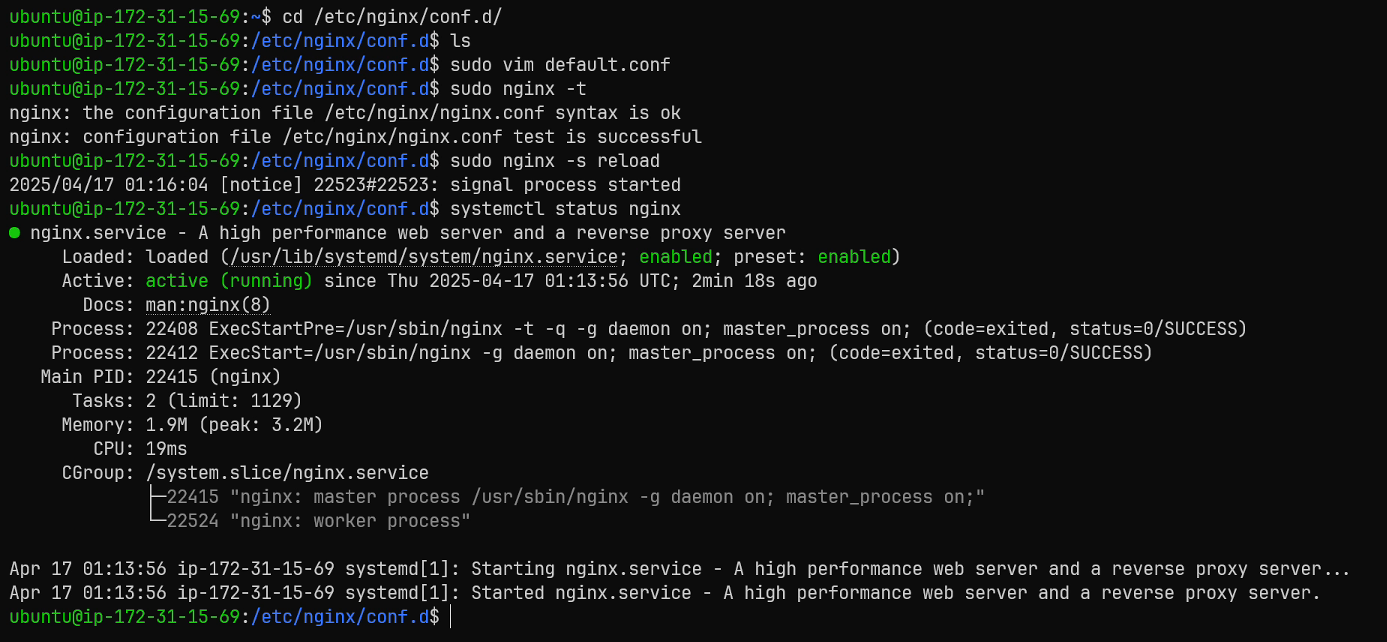
Back in my ec2 instance, i'm going to change directory into /etc/nginx/conf.d.
And as you can see, i do not currently have a default configuration file, so i will run sudo vim default.conf.

I am simply going to paste my minimal default configuration into this file.
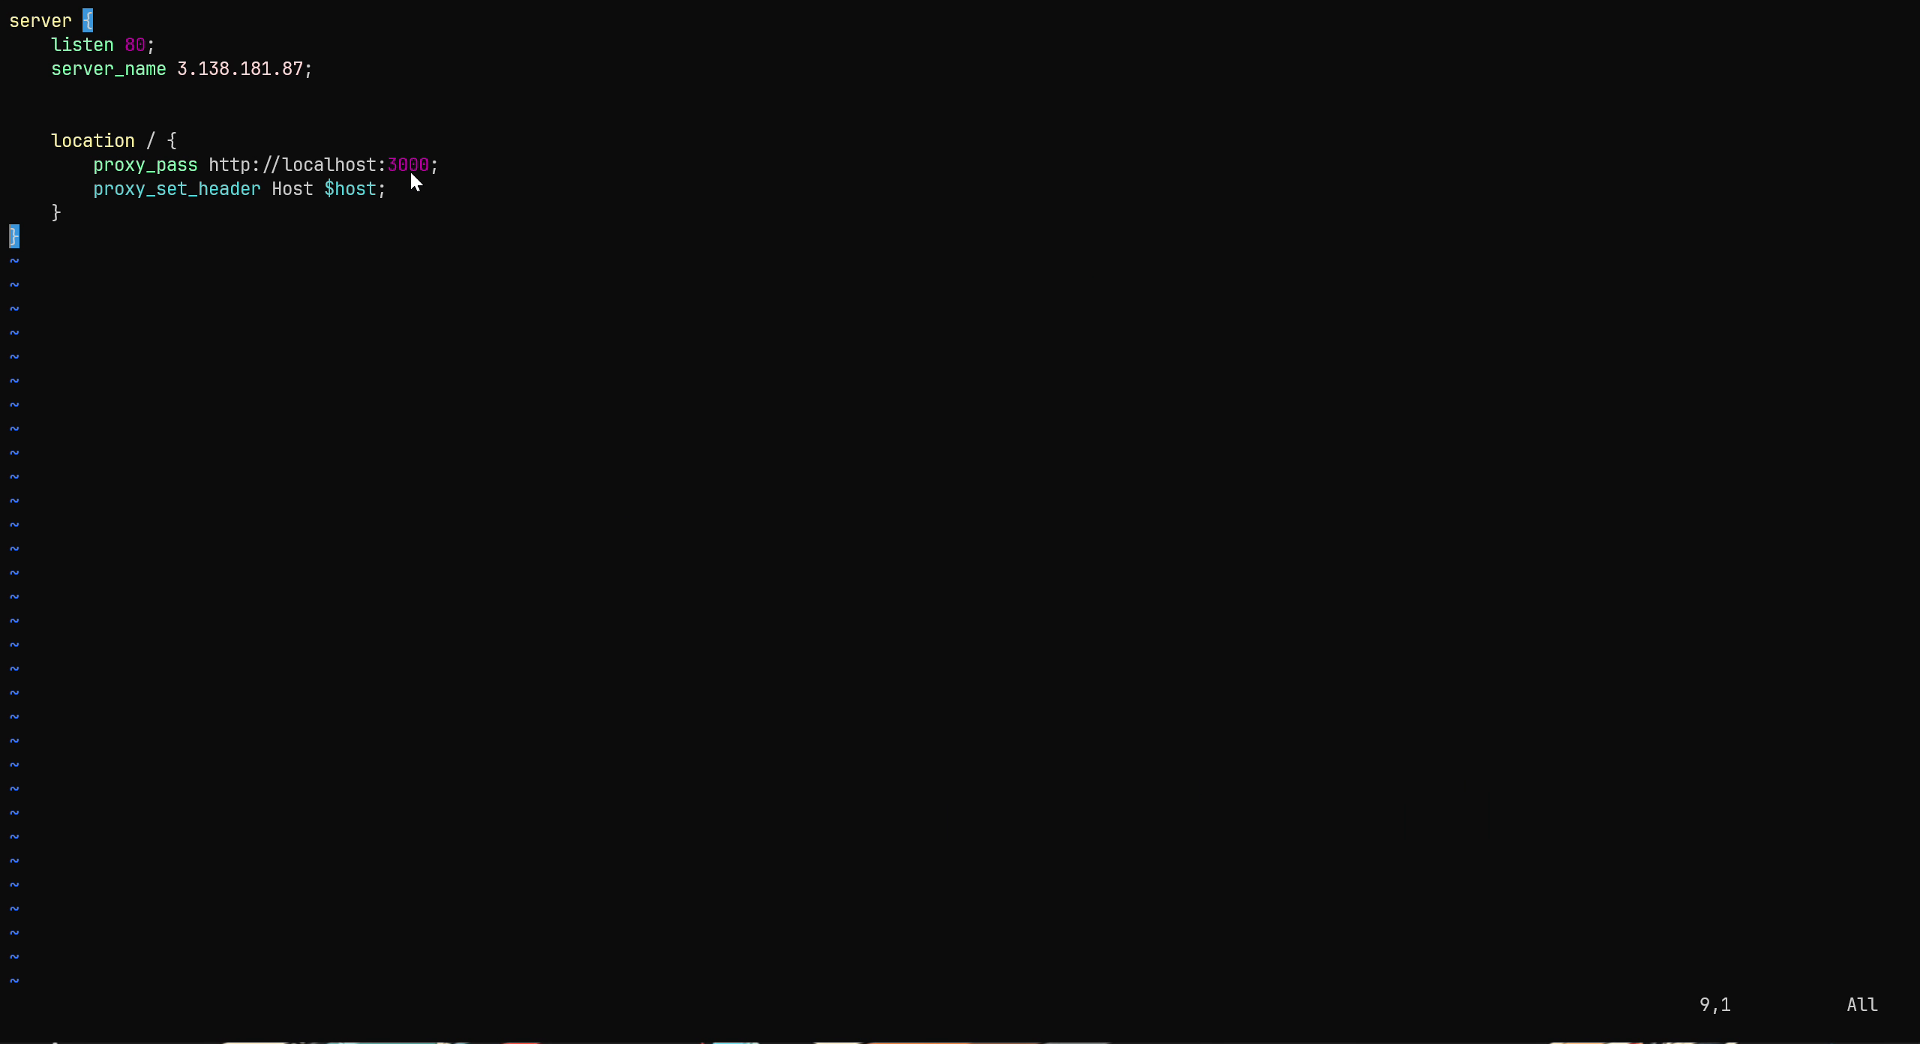
I will then save and exit vim.
I will now run sudo nginx -t to test the configuration file for errors, and it passes.
I will then run sudo nginx -s reload to reload nginx's configuration files.
Next, i will type systemctl status nginx to confirm that nginx is running properly, and it is.
The only thing to do now is to make a request to the ec2 instance from my local machine, to ensure that nginx is configured properly, receiving requests, and reverse proxying them to the todos application. I'm going to execute curl http://<ec2-public-ip>/todos.
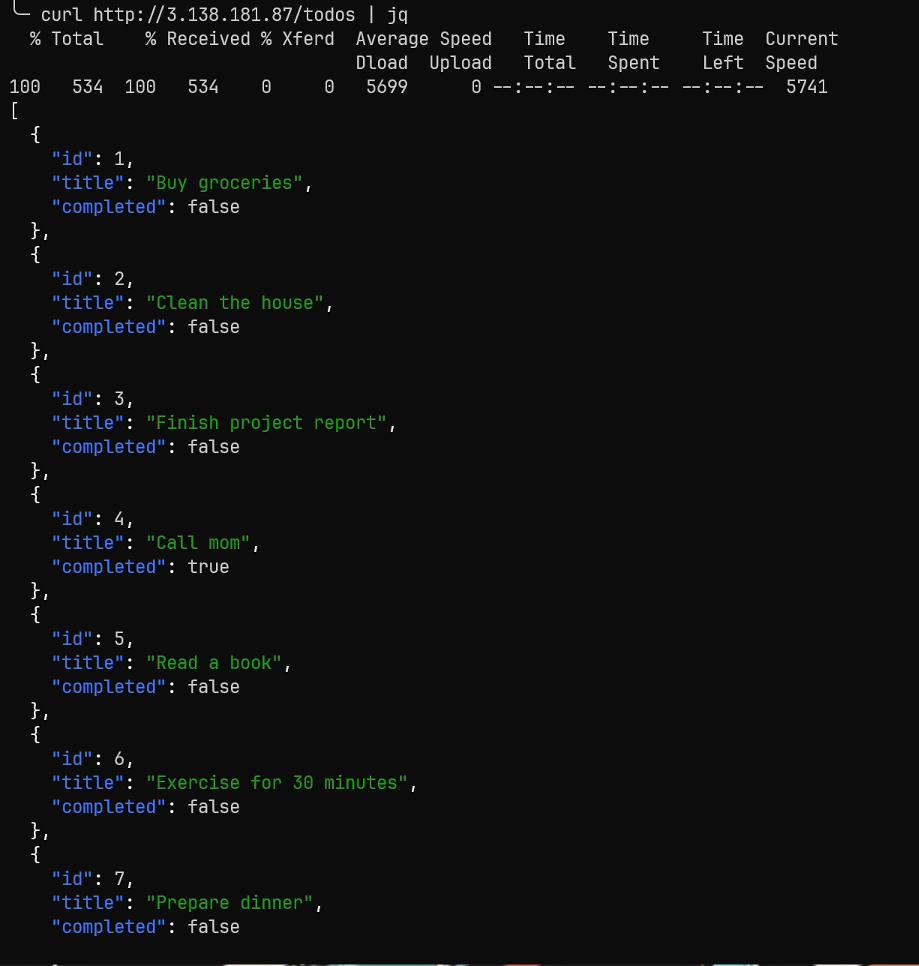
As can be seen, we get the exact same output as when we curled localhost from inside the ec2 instance. Our deployment is now complete.